Windows 11 insider builds are here, and have offered plenty of excitement for scores of Microsoft PC users in terms of what the next generation operating system comprises. If you have managed to sustain beyond the initial round of confusion surrounding TPM chips, compatible processors and which devices would even support Windows 11, chances are that by now, you would have had a reasonably good stretch of experience on what the latest Windows OS has in store. Now, after you’ve had the experience, if you do not wish to persist on the Insider beta channels and want to go back to a Windows 10 build that you had running on your PC before, Microsoft thankfully allows you to do that, too. Here’s looking at a step-wise guide to how you can roll back (or uninstall) your Windows 11 beta update to downgrade your PC back to Windows 10, if that is what you want at the moment.
Backup Your Files Before Downgrading Windows 11
Before you proceed with the process of uninstalling Windows 11, it is a good idea to backup all your important files. While rolling back to Windows 10 will not erase your data, it is typically known to be a good practice to make sure that your data is backed up, in case the update goes wrong for some reason. A lot of common reasons may contribute to the rollback installation faltering, in which case you may risk losing your data. Hence, make sure that you have all your sensitive files either uploaded to a cloud storage drive, or copied to a local external drive — just in case.
How to Rollback Windows 11 to Windows 10 in 10 Steps
Thankfully, the way to go about the Windows 11 roll back process is not overly complicated, and can be done directly through a tool found in Microsoft’s settings options itself. Here’s how.
- Click on the Start button, and click on Settings
- Under Settings, click on Windows Update. Here, select the third option under the ‘More Options’ sub-head – ‘Advanced options’. Under this, click on ‘Recovery’.
- Here, click on the ‘Go Back’ button beside the ‘Previous version of Windows’ tab. This will initiate the Windows 11 roll back process for you.
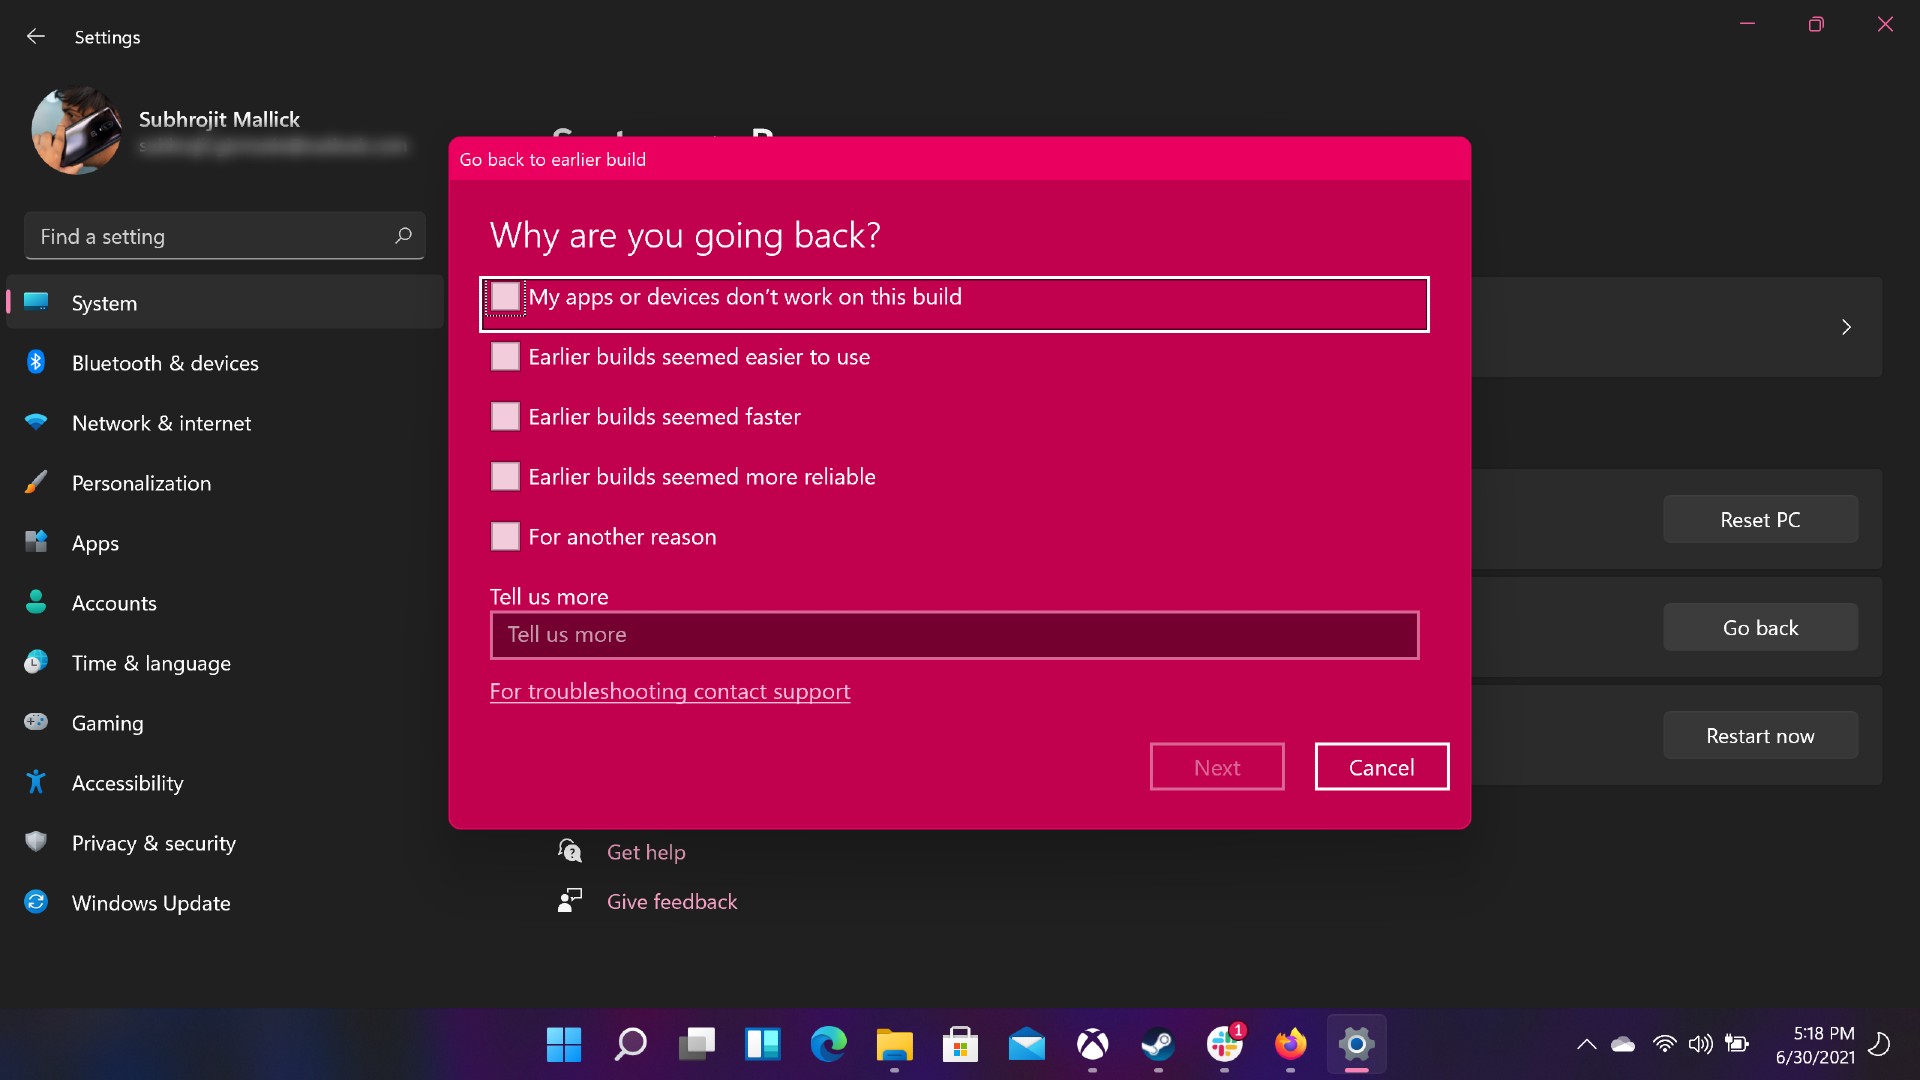
- In the first step, Microsoft will issue a familiar prompt that looks like the Windows 10 PC reset window. It then asks you to select a reason why you wish to go back to Windows 10. Select whichever option you feel is appropriate.
- No matter which option you select, Microsoft will still issue a second prompt asking you to reconsider your decision by checking for any new updates, urging you that “this might fix the problems you’re having.” Select ‘No, thanks’ here.

- You are then issued with a prompt that gives the statutory Windows PC reset warning. For laptop users, the device will need to stay plugged in to power during this process. Interestingly, the prompt also states that users will have to reinstall “some” apps and programmes, once rolled back to Windows 10 from Windows 11.
- The final prompt reminds users to keep their Microsoft account and device passwords handy, which would be required during the roll back process.
- Click ‘Next’ on the above option, and on the next screen, finally click on the ‘Go back to earlier build’ button to start the process.
- You will then see a blank screen for a while, after which you get a Windows loading screen with the message, ‘Restoring your previous version of Windows’. This process will be automatic, and you may be required to enter your device or Microsoft password, wherever prompted.
- Once this entire setup completes, you will have your Windows 10 build back on your PC.
Frequently Asked Questions (FAQs)
Will downgrading to Windows 10 delete everything?
No, downgrading to Windows 10 will not delete any data of yours, if everything goes how it should. Sometimes, issues with the installation process may cause a rollback or an update to be faulty, in which case you may then be required to reset your PC and install Windows from scratch. It is only in these cases that you may lose your data, but as long as the installation process goes without any glitches, your data should not be deleted from your PC.
The post Windows 11 Rollback: How to Uninstall Windows 11 and Downgrade to Windows 10 appeared first on MySmartPrice.


0 Comments